
For image editors, one of the most common jobs that leave the transparent frame is Removing a background. There are many ways that GIMP Background Removal and construct transparent. GIMP has many devices that enable us to choose and remove backgrounds. Further, it is free and open-source software generated and managed by a devoted group of volunteer creators. This is a fully featured image editor with strong devices to construct the best photographs and graphics. Simply we use it. In addition, GIMP resizes the images and also constructs them like Photoshop. And we cut out the photo background to apply the device of GIMP. Moreover, all types of image editing operate in this software like as removing background, retouching images, masking, etc.

What is GIMP Background Removal?
GIMP short for GNU Image Manipulation Program provides many useful devices and sections that play the main role to generate professional images. This is the photo editing software that is free, not like the other Adobe Photoshop, yet for business purposes we easily use this for image editing proposes. Several methods we used to remove the background and based on the image properties, like the in-image color contrast, explanation about the object, and many more. Further, For beginners, it is not very difficult they easily use this app because it is very easy and simple. They follow the learning steps and remove the background. Next, For more understanding, you read some that easily help you to remove the background in the image.
How We Construct the Image in GIMP:
- Firstly, Begin GIMP and utilize File-Open to choose the image you obtain to remove the background from. You utilize any picture that is required and then make its outline of your subject and also you approach the variety of quality.
- After addition, the addition of an alpha channel in the active layer by the left presses on the active layer, after choosing the Add Alpha Channel on the right click.
5 Method Use in GIMP for Removing the Background in Image:
There are 5 easy and simple methods we use in GIMP for removing the background in the image. These are:
- Fuzzy Select Tool
- Select by Color Tool
- Paths Tool
- Layer Mask Tool
- Foreground Select Tool
1. Fuzzy Select Tool:
This tool enables you to choose all pixels that are the same to set the sample pixels in the image to the local area. In addition, It operates the images with color distinction among background and foreground images. Whether, if your background and prominent subject of the image is the same color, in this way it does not help you. Next, Then you use some other methods. Yet now in this, you move across the head and attempt all the ways whether you have the spare time.
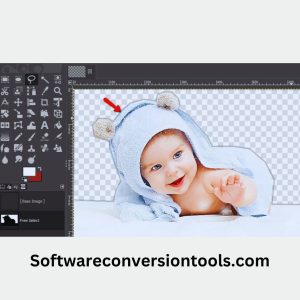
- In GIMP open your image.
- In layer click and add Alpha channel. It is so secure that you simply remove your layer with transparency. Already the alpha channel is added to your image You can verify this and never right-click the layer and see whether the add Aplha channel collapses.
- , Choose the Fuzzy Select device from the toolbox and also construct the Anti-Aliasing, Draw Mask, and Feather Edges. Further, The choice of Draw Masks will assist you in visualizing the background you obtain.
- After pressing on the section of the image of the background that you obtain remove and hold down your press, and in the image you drag the mouse to look at the mask drawn on your image.
- Next, In the color, section appears the selection that you are selecting. Breneth if you drag the mouse to enhance the threshold of your selection, and about up, it will decrease the threshold of your selection.
- In your selection at once you are satisfied, then declare the mouse and click delete in the delete selection from your keyboard.

Again repeat your process whether you obtain to remove the background of your entire image.
2. Select by Color Tool:
GIMP Background Removal has the second method which we choose by a color device that selects the internal background in similar color pixels. Besides, vector images, work better and have a constant color distribution. Further, for real-world images, this method does not work with a lot of color gradients or fast edges.
- In the toolbox, you select the ”select by color” tool. Construct the Anti-Aliasing and Draw Mask are capable of the choices.
- Suerly to capable the Features Edges choice whether you are operating with the composite vector image.
- After, in your image click on the background section having a similar color and drag the mouse up and down to enhance or reduce the threshold.
- And, With the selection at once you are happy, let’s move the mouse hold. From your keyboard, you click the delete.

Again and again, you repeat this process several times to eliminate the background.
3. Paths Tool:
Paths tool is the other method that removes the background of an image. It is the manual method of deleting the background of the image. Among all the methods it gives you the most accurate results Whether you use all these methods then you realize this point that I mentioned in it. Yet it takes a little time then do it.
- Firstly, From the toolbox select the path tool.
- Start clicking the image around the main part of the subject to position the individual’s point and then outline the subject.
- Further, this enables you to curve the line by dragging beneath the middle of the line and operating the left and right handles regarding the middle of the line.
- To constant drawing, make sure you press on the near point and constants.
- Once concluded, by holding the CTRL you close the outline and click the position on the first point.
- Next, Using the outline press Enter to generate a selection.
- In addition, Select the menu, from the menu. The background of the image will be selected.
- Lastly, After deleting the background press the delete.
4. Layer Mask Tool:
Removing the background method that is advanced so, you use the Layer Mask. For photographers, it is beneficial to where good explanations like furs, hairs, grass, etc. Those who find the fine explanation utilizing the above methods. Yet there is a catch. High-level contrast of color this method works best. Present the main point of the image and background.
- Generate a duplicate layer by right-clicking on the layer.
- After, selecting the duplicated layer, Move to Color>Satuartion. Alternate the scale of all the methods to zero. Press ok.
- Move to Color> Curves and standard modify the up and down nodes and fill the image’s main subject with more black and white in its background.
- Choose Color> Invert from the menu. After, choose Edit> Copy Visible.
- And by clicking on the small eye icon on the right toolbox you secret the duplicate layer.
- Next, In the actual layer the right click and Add the layer Mask. Press Add.
- Using Edit>Paste and past the copied image visible.
- At the bottom layer of the window unify the pasted layer into the layer mask and click on the green icon. At this point, you notice that the black area is visible, and the other white area is transparent.
In the section to fine-tune, you utilize the brush tool that is white color, and after this fill the section of the main point of the subject yet become transparent in the process.
5. Foreground Select Tool:
Now the last and final method is the explanation of the Foreground Select tool. For complex images, grass, hairs, etc. all of these are taken in this it is a great choice. In addition, Get Going, from the toolbox select the Foreground
Select the tool and on the subject do the simple outline. This does not require to be perfect, such as below. Further, it is most like the outline envelope of the internal subject.

- Firstly, complete at once, the first pin to the select pint join select the subject press enter.
- It will generate the dark blue area above the background and in the foreground the light blue area.
- After the white foreground, and you select without moving too much toward the edges you manually brush the subject.
- Next, Complete at once you chose the preview to look like it’s seen. The color profile of your image is based on it, in the process this preview is set to a couple of seconds.
- Whether you are satisfied with the preview, select the click. After, you enter to construct this section.
- Utilizing Select>Invert in invert the selection.
- And, From the keyboard press the selection.
- Without the background portion, you ready your image.
Moreover, it does not matter which method you use actually our purpose is to remove the background. Which matter is suitable for your proposal it all depends on you. So next, carefully read all these methods and use them which is more suitable for you. Moreover, information about whether the Is TeamViewer is Free or not about complete information is taken from this article and it is best for remote access.
Final Review of GIMP Background Removal:
As above we completely discuss the GIMP Background Removal. There are 5 methods we discuss any method you use to remove the background distortions. You making some adjustments to its parameters. Further, each and every method has its particular works that performs and every has a specific purpose. To use this free software you remove the background of the photographs and images easily by following these above-mentioned steps.

Moreover, for business means high-level quality, and it does not produce professional images such as Photoshop. For professional making, you use Adobe Photoshop. During removing the image backdrop if you face any problems then you use this free trial. Whether, if you try this it is very beneficial for you to remove the background simply as you do in GIMP. So, you try this free app and enjoy its lot of features.
Most Frequently Asked Questions:
Q: For the removal of the background which software is best?
Besides, For removing the background there is a lot of software that is best and works properly like Adobe Photoshop, Adobe Express, PhotoDirctor, Photo Room, and many more.
Q: In GIMP why is the background removal plugin?
Blend remove. bg into GIMP and your workflow in supercharge. Further, For your creativity, you spend more time on it, and for manually picking the pixels spend less time. Next, In GIMP when you remove the plugin automatically the background image is removed in seconds with this at any time during the editing of the images or photos.
Q: In GIMP does the magic eraser device?
YES, if you have used the tool many times then you know about every feature of the image menu across the tools -Paint tools-Eraser on the tool icon by clicking from the Toolbox; or in addition utilizing the Shortcut shift+E from the keyboard.